Q&A
Q. How do I order Zenair Floats, accessories or rigging components?
A. Visit this page of the website for all the instructions, or call 705-526-4537.
Q. Can I mount Zenair floats on a certified aircraft (Cessna, Piper, etc.)?
A. Yes and no. Zenair floats are not certified. However, some aviation authorities (CAA) allow a one time STC. Contact your local CAA for details; you can also discuss the subject with your aircraft mechanic. To install Zenair Floats on a Type Certificated aircraft in the USA, you will need to obtain a one-time “field approval” in order to remain paperwork-legal. For more information on "field approvals" you can visit this website:
http://www.faa.gov/aircraft/air_cert/design_approvals/field_approvals/field_approv_proc/
Q. How do I mount the floats to my aircraft?
A. Zenair supplies a Rigging / Spreader bars kit. This kit includes the 2 streamlined spreader bars joining the floats and the struts which will attach the spreader bars to the aircraft. Neither the struts nor the spreader bars are cut to a specific length. When installing the floats to your aircraft, you will cut them to fit. Also included in this kit are the brackets that attach the struts to the spreader bars. These brackets were designed to allow the struts to be adapted to any aircraft. All the hardware for the spreader bars, brackets and cross cables (front and rear) are also included in the Rigging / Spreader bars kit. Note: Zenair does NOT supply the custom-brackets that will be necessary to mount the top of the struts to the airframe.
Q. How high will my plane be on Zenair floats?
A. In the case of the STOL CH 750, the rudder is raised approximately 2 feet and 4 inches (11 ft. total) when the aircraft is mounted on a set of #1450 amphibious floats. The struts provided in Zenair's generic rigging kits still need to be cut to size (length); aircraft height can therefore still be modified based on needs of particular installation (i.e. more prop clearance, etc.)
Q. Can I mount the floats on a Glasair Sportsman 2+2?
A. Yes! The 2500# floats are perfect for this aircraft.
Q. How about mounting the floats on an SLSA aircraft?
A. Yes, but the aircraft manufacturer must authorize this. If authorization is not forthcoming, you can change your aircraft from an SLSA to a ELSA; you can then install the floats as the aircraft is now experimental. For more information on this, please contact the EAA.
Q. Shipping from Canada to the USA: How easy is that?
A. Zenair has been shipping kits to the USA for more than 30 years. There are no duties on Civil Aircraft Parts and no taxes at the border, so shipping from Canada is simple and Zenair takes care of all the documentation. Note that your State may want you to pay taxes at a later date; A Tax ID number will be necessary for the shipping documents.
Another option to "factory-direct shipping" is for you to pick-up the floats at Zenith Aircraft Co in Mexico, MO USA. With this option, you pay for the crating costs but not the shipping costs.
Q. When assembling floats from a Standard Parts Kit (SPK), what documentation do I get to assist me in the building process?
A. When you get your float kit, you will also receive:
- The "Parts List" with all parts itemized - for easy reference and quick inventory;
- Assembly drawings with all the necessary dimensions, hole locations etc. You will have enough information to finish the floats from these drawings.
- Access to the assembly photo guides. These illustrated manuals complement the drawings and helps you through the assembly process. These password protected PDF guides are posted on the internet from where you can download them for easy reading. We keep them online for easy updating.
- Optional DVDs, available from http://homebuilthelp.com/Floats.htm Note: if desired, you will need to purchase this separately from HomebuiltHelp.com (HomebuiltHelp is an independent publisher - not part of Zenair).
- When you still have assembly questions, email or call Zenair; our customer service is one of the best!
Q. How easy is it to assemble the floats from the Standard Parts Kit?
A. Zenair floats were designed to be extra strong but also easy to build. Most float manufacturers supply factory built products, so their designs are typically complex. They have jigs and assembly tooling and expert labor to assemble them. Zenair floats were designed with the first time builder in mind so everything is straight forward and simple. What really makes the assembly easy is the half rounded top part of the floats: After you make the table with wood saddle-type positioning jig, the rest is very straight forward. The DVD really shows how the assembly goes together; we even provide an assembly photo-guide on how to build the table and saddles.
A. Visit this page of the website for all the instructions, or call 705-526-4537.
Q. Can I mount Zenair floats on a certified aircraft (Cessna, Piper, etc.)?
A. Yes and no. Zenair floats are not certified. However, some aviation authorities (CAA) allow a one time STC. Contact your local CAA for details; you can also discuss the subject with your aircraft mechanic. To install Zenair Floats on a Type Certificated aircraft in the USA, you will need to obtain a one-time “field approval” in order to remain paperwork-legal. For more information on "field approvals" you can visit this website:
http://www.faa.gov/aircraft/air_cert/design_approvals/field_approvals/field_approv_proc/
Q. How do I mount the floats to my aircraft?
A. Zenair supplies a Rigging / Spreader bars kit. This kit includes the 2 streamlined spreader bars joining the floats and the struts which will attach the spreader bars to the aircraft. Neither the struts nor the spreader bars are cut to a specific length. When installing the floats to your aircraft, you will cut them to fit. Also included in this kit are the brackets that attach the struts to the spreader bars. These brackets were designed to allow the struts to be adapted to any aircraft. All the hardware for the spreader bars, brackets and cross cables (front and rear) are also included in the Rigging / Spreader bars kit. Note: Zenair does NOT supply the custom-brackets that will be necessary to mount the top of the struts to the airframe.
Q. How high will my plane be on Zenair floats?
A. In the case of the STOL CH 750, the rudder is raised approximately 2 feet and 4 inches (11 ft. total) when the aircraft is mounted on a set of #1450 amphibious floats. The struts provided in Zenair's generic rigging kits still need to be cut to size (length); aircraft height can therefore still be modified based on needs of particular installation (i.e. more prop clearance, etc.)
Q. Can I mount the floats on a Glasair Sportsman 2+2?
A. Yes! The 2500# floats are perfect for this aircraft.
Q. How about mounting the floats on an SLSA aircraft?
A. Yes, but the aircraft manufacturer must authorize this. If authorization is not forthcoming, you can change your aircraft from an SLSA to a ELSA; you can then install the floats as the aircraft is now experimental. For more information on this, please contact the EAA.
Q. Shipping from Canada to the USA: How easy is that?
A. Zenair has been shipping kits to the USA for more than 30 years. There are no duties on Civil Aircraft Parts and no taxes at the border, so shipping from Canada is simple and Zenair takes care of all the documentation. Note that your State may want you to pay taxes at a later date; A Tax ID number will be necessary for the shipping documents.
Another option to "factory-direct shipping" is for you to pick-up the floats at Zenith Aircraft Co in Mexico, MO USA. With this option, you pay for the crating costs but not the shipping costs.
Q. When assembling floats from a Standard Parts Kit (SPK), what documentation do I get to assist me in the building process?
A. When you get your float kit, you will also receive:
- The "Parts List" with all parts itemized - for easy reference and quick inventory;
- Assembly drawings with all the necessary dimensions, hole locations etc. You will have enough information to finish the floats from these drawings.
- Access to the assembly photo guides. These illustrated manuals complement the drawings and helps you through the assembly process. These password protected PDF guides are posted on the internet from where you can download them for easy reading. We keep them online for easy updating.
- Optional DVDs, available from http://homebuilthelp.com/Floats.htm Note: if desired, you will need to purchase this separately from HomebuiltHelp.com (HomebuiltHelp is an independent publisher - not part of Zenair).
- When you still have assembly questions, email or call Zenair; our customer service is one of the best!
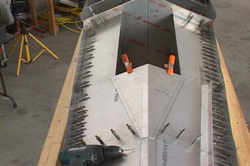
Q. How easy is it to assemble the floats from the Standard Parts Kit?
A. Zenair floats were designed to be extra strong but also easy to build. Most float manufacturers supply factory built products, so their designs are typically complex. They have jigs and assembly tooling and expert labor to assemble them. Zenair floats were designed with the first time builder in mind so everything is straight forward and simple. What really makes the assembly easy is the half rounded top part of the floats: After you make the table with wood saddle-type positioning jig, the rest is very straight forward. The DVD really shows how the assembly goes together; we even provide an assembly photo-guide on how to build the table and saddles.
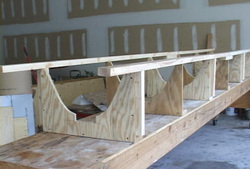 Step #1. Build your float table by using the detailed instruction in the photo guide |
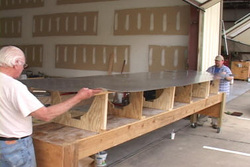 Step#2. The flat skin will fit and form itself when placed into the float table. Float is assembled upside down. ie top of the float is facing down. |
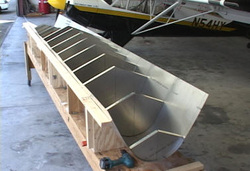 Step #3. Install the pre-formed bulkheads to the skin. |
 Step #4. Position the bottom skins to the bulkheads and drill all the holes. These 4 steps forms the floats. |
Q. How do the parts come in the "Standard Parts Kit" (SPK)?
A. All the parts requiring jigs or forming blocks are pre-formed. You will not need a bending brake or shear. All full bulkheads are formed and ready to install. All you need are basic hand tools such as a drill, clecos (temporary fasteners), hand snips, files, riveter, typical wrenches and other basic hand tools. You will not have to fabricate parts from scratch although some parts will require final forming/adjustments with a hand-held fluting plier. All bolts used are standard aircraft AN type. No metric tools are needed. The above 4 steps (see illustrations) are for the "Parts Kit".
Q. What about the installation of the amphibious wheel system?
All the necessary parts are provided, including the hydraulic cylinders for raising and lowering the wheels, hydraulic fittings, pump, regulator and reservoir, wheel hubs with disk brakes, tires, axles, etc. The assembly drawings, detailed assembly instructions and photo guides are used for this installation.
Q. What shock absorber system is used when landing with the wheels down?
A. The tires themselves are used to absorb the landing loads as well as the flexing in the spreader bars. This is one reason we use extra large tires in our Floats. On the large series floats with the 7.00x6 tires, the distance between the outside tire diameter and hub is about 6". This 6" of tire is an excellent shock absorber and very simple. On the 1450 lbs floats, there are more than 4 inches of tire absorption. The extra large tires are also excellent for grass strip landings. Note that when lading on the water, the flexing of the spreader bars is the only shock absorber. Water is very hard at 60 MPH. This is why the step and keel areas are designed extra strong.
Q. Can I add limit-switches on the gear that can be used to power gear-position indicator lights?
A. Absolutely! Most who want this use basic Radio Shack limit switches for this. Another option is to have a rod that moves up and down with the wheel system and that you can visually see. A mirror on the wing strut is also strongly recommended.
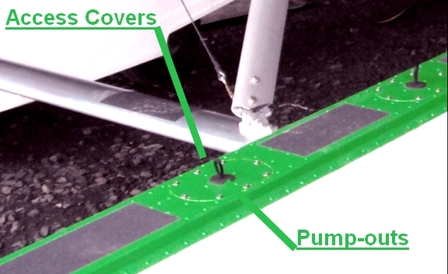
Q. What about pump out holes?
A. The kit comes with basic plastic plugs that fill a 1 3/4" dia hole. Pop the plug out, insert a hose that is hooked up to a hand pump and pump the water out. This is a very light and simple system that works well. However, some prefer the classic "Aluminum Pump-Out Cup" used on older certified floats. You can buy these and the accessories from http://www.lakeandair.com/category-s/26.htm
A. All the parts requiring jigs or forming blocks are pre-formed. You will not need a bending brake or shear. All full bulkheads are formed and ready to install. All you need are basic hand tools such as a drill, clecos (temporary fasteners), hand snips, files, riveter, typical wrenches and other basic hand tools. You will not have to fabricate parts from scratch although some parts will require final forming/adjustments with a hand-held fluting plier. All bolts used are standard aircraft AN type. No metric tools are needed. The above 4 steps (see illustrations) are for the "Parts Kit".
Q. What about the installation of the amphibious wheel system?
All the necessary parts are provided, including the hydraulic cylinders for raising and lowering the wheels, hydraulic fittings, pump, regulator and reservoir, wheel hubs with disk brakes, tires, axles, etc. The assembly drawings, detailed assembly instructions and photo guides are used for this installation.
Q. What shock absorber system is used when landing with the wheels down?
A. The tires themselves are used to absorb the landing loads as well as the flexing in the spreader bars. This is one reason we use extra large tires in our Floats. On the large series floats with the 7.00x6 tires, the distance between the outside tire diameter and hub is about 6". This 6" of tire is an excellent shock absorber and very simple. On the 1450 lbs floats, there are more than 4 inches of tire absorption. The extra large tires are also excellent for grass strip landings. Note that when lading on the water, the flexing of the spreader bars is the only shock absorber. Water is very hard at 60 MPH. This is why the step and keel areas are designed extra strong.
Q. Can I add limit-switches on the gear that can be used to power gear-position indicator lights?
A. Absolutely! Most who want this use basic Radio Shack limit switches for this. Another option is to have a rod that moves up and down with the wheel system and that you can visually see. A mirror on the wing strut is also strongly recommended.
Q. What about pump out holes?
A. The kit comes with basic plastic plugs that fill a 1 3/4" dia hole. Pop the plug out, insert a hose that is hooked up to a hand pump and pump the water out. This is a very light and simple system that works well. However, some prefer the classic "Aluminum Pump-Out Cup" used on older certified floats. You can buy these and the accessories from http://www.lakeandair.com/category-s/26.htm
|
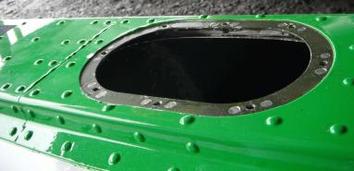
As an option (and for easier access to individual float compartments), you can install larger inspection panels - on the walkways with our larger-sized floats (#2200 & #2500) or on the sides with the smaller floats (#1150 & #1450).
When installing flush-mounted inspection panels in the top walkway, you can even add classic "Aluminum Pump-Out Cups" into the hole covers/panels (see picture on left). (Click on picture for larger view) |
|
Q. How many sealed compartments are there in the floats? A. This will depend on the float size. However, there are typically 4. When building the floats, you can add more. Q. What about baggage compartments in the floats? A. The floats do not come with baggage lockers. For smaller aircraft, there is typically not enough useful load left for extra baggage. However, one can always cut out locker holes as the floats are aluminum. With the larger floats, the walkway area is wide at 9", so round plastic (boat) deck-plate covers can be added. http://www.fishreports.net/boat-accessory/hatches.html Q. What else can I add to the floats? A. As experimental floats, you can add as much as you like. However, Zenair floats were designed for simplicity, toughness and light weight at a reasonable price. Each time you add something, the complexity, price and weight goes up - including your building time. |
 |
|
Q. How can I access inside the compartments?
Access-hole cut-outs on the walkway are possible as shown in the photos (above and at right). These optional access holes are also practical for sealing leaks and/or for maintenance. Optional flush-mounted covers for such cut-outs are now available from AFM; they can be mounted on the float sides (all sizes) or in the top walkways of our larger floats sizes. Order desired quantities when placing your float-kit order. (Click on picture for larger view) |
|
|
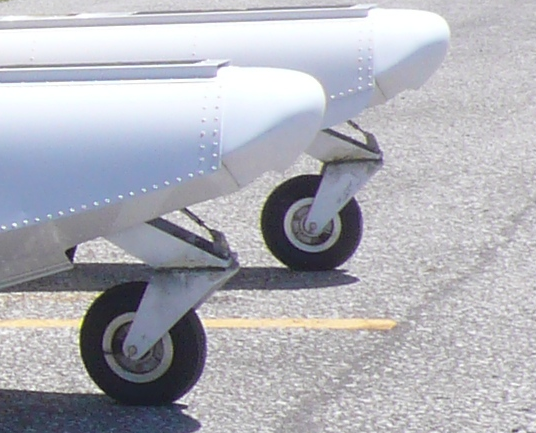
Q. I heard that there have been issues with the nose-wheel system on some of the floats.
A. Yes, for a while, Zenair floats were built in the Czech Republic where the nose-wheel system was designed for ultralight STOL type aircraft only (slow-landing speeds). When landing faster, the system was not strong enough. At Zenair, where we now design and build all new Zenair floats, the nose-wheel system is much tougher - as are the floats overall. |
|
Q. How do I order my float kit?
A. For a price quote, simply complete the Quote Request Form.
If you have additional questions, contact AFM Inc. by e-mail ([email protected]) or phone at 705-526-4537.
Requests for quotes will typically be answered by e-mail; call or fax for other arrangements. The AFM Fax number is 705-526-8022. Paying the deposit with a VISA card is fine, just add VISA details to the order form (or call). Once AFM Inc. has your signed order and deposit, your floats will be given a production slot. Delivery times vary depending time of year ordered, but are typically 2-3 months.
Q. What about drawings and assembly instructions?
A. Exploded-view drawings and assembly manuals are available on-line for all customers assembling their own Zenair Float kit. These resources are password protected; qualified kit owners may request the necessary password free of charge by following these simple steps.
Q. Can I get Zenair float parts from AFM if needed for maintenance and/or repairs?
A. Absolutely - but only if you have genuine Zenair Floats! See here for ordering instructions. CAUTION: If, you purchased your floats from CZAW - or bought second-hand Zenair "look-a-like" floats built in the Czech Republic - then we cannot help you with replacement parts, technical support or customer service (our parts are not compatible).
Q. What are customers saying about the floats?
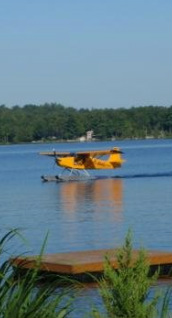
A. I am 10 hours into the 25hr test flying phase with the floats. I did have the Highlander on 29 inch tundra tires before that. I have only lost 5 knots airspeed in the cruise, so I now cruise at 75 knots with the floats.
I used the CH 750 suggested positioning of the floats (2000 mm between floats, 600 mm floats to fuselage, a 3 degree float angle, and the step 2 inches AFT of most aft C of G). On the Highlander, this causes a FWD CG, but does allow full baggage and fuel. The aircraft still handles well, both on runways, and water.
I was concerned about nose wheel shimmy, but I have not experienced any problems.
The handling on the ground, in the air and on water has been predictable and well behaved.
I would recommend the Zenair 1450 aluminum amphib floats to other Highlander aircraft owners.
Thanks for the assistance along the way.
Pete Hicks
Melbourne Australia
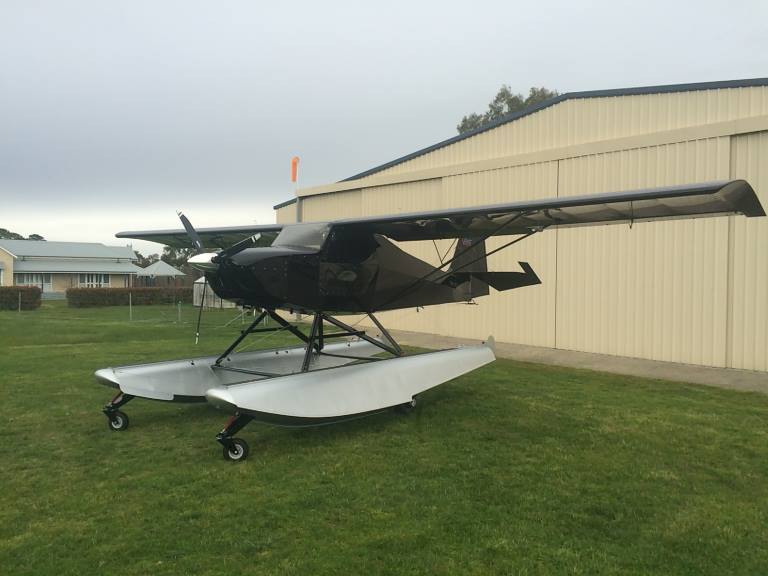
October 2015 Highlander on the Zenair 1450 amphib floats. Below.
A. For a price quote, simply complete the Quote Request Form.
If you have additional questions, contact AFM Inc. by e-mail ([email protected]) or phone at 705-526-4537.
Requests for quotes will typically be answered by e-mail; call or fax for other arrangements. The AFM Fax number is 705-526-8022. Paying the deposit with a VISA card is fine, just add VISA details to the order form (or call). Once AFM Inc. has your signed order and deposit, your floats will be given a production slot. Delivery times vary depending time of year ordered, but are typically 2-3 months.
Q. What about drawings and assembly instructions?
A. Exploded-view drawings and assembly manuals are available on-line for all customers assembling their own Zenair Float kit. These resources are password protected; qualified kit owners may request the necessary password free of charge by following these simple steps.
Q. Can I get Zenair float parts from AFM if needed for maintenance and/or repairs?
A. Absolutely - but only if you have genuine Zenair Floats! See here for ordering instructions. CAUTION: If, you purchased your floats from CZAW - or bought second-hand Zenair "look-a-like" floats built in the Czech Republic - then we cannot help you with replacement parts, technical support or customer service (our parts are not compatible).
Q. What are customers saying about the floats?
A. I am 10 hours into the 25hr test flying phase with the floats. I did have the Highlander on 29 inch tundra tires before that. I have only lost 5 knots airspeed in the cruise, so I now cruise at 75 knots with the floats.
I used the CH 750 suggested positioning of the floats (2000 mm between floats, 600 mm floats to fuselage, a 3 degree float angle, and the step 2 inches AFT of most aft C of G). On the Highlander, this causes a FWD CG, but does allow full baggage and fuel. The aircraft still handles well, both on runways, and water.
I was concerned about nose wheel shimmy, but I have not experienced any problems.
The handling on the ground, in the air and on water has been predictable and well behaved.
I would recommend the Zenair 1450 aluminum amphib floats to other Highlander aircraft owners.
Thanks for the assistance along the way.
Pete Hicks
Melbourne Australia
October 2015 Highlander on the Zenair 1450 amphib floats. Below.